Control AWTRIX NG via Telegram
Use with Home Assistant Blueprint
Control your AWTRIX NG via Telegram (Home Assistant Automation)
- Topic
- Smarthome
- Includes
- Flow
Runs on
- Runs on 32×8 (TC001 & DIY)
- Does not run on 52×16 (TC002) Made for 32×8 (TC001 & DIY).
- Does not run on 32×8 with AWTRIX 3 (TC001 & DIY) Made for AWTRIX NG.
Flow description
📱 Control your AWTRIX NG via Telegram (Home Assistant Automation)
This Home Assistant automation allows you to control your AWTRIX NG smart clock using a fully interactive, button-based menu in Telegram. It runs 100% locally via Home Assistant and MQTT, meaning you can control your clock and send messages to it from anywhere in the world without needing extra apps!
✨ What it does (Features)
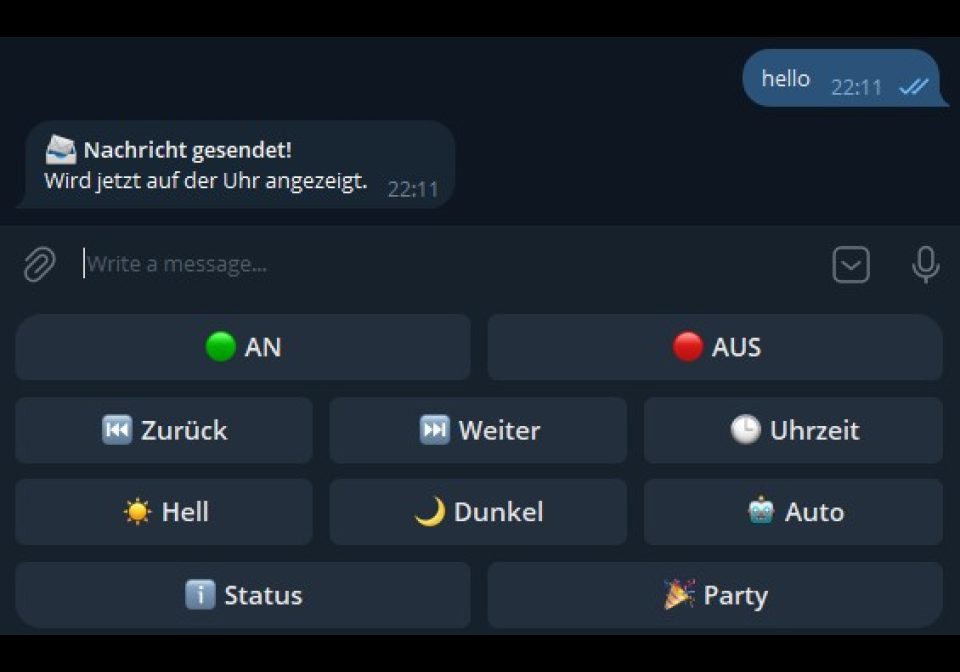
Once installed, simply send any message to your Telegram Bot and a custom keyboard menu will appear at the bottom of your chat:
Power & Brightness: Turn the display ON/OFF, and set brightness to Maximum, Minimum, or Auto.
App Navigation: Skip forward, backward, or jump straight back to the Time app.
Live Hardware Status: Press the "Status" button to instantly get a reply with your clock's current Temperature, Humidity, Battery level, Wi-Fi strength, and Lux sensor data.
🎉 Party Mode: Pressing the "Party" button triggers a random, full-screen background animation on your clock (Plasma, Fireworks, Ripple, Pacifica, ColorWaves, or TwinklingStars) for 10 seconds.
💬 Free-Text Messaging: The best feature! If you type any regular text message (e.g., "Dinner is ready!") and send it to the bot, it will automatically catch the text and scroll it across your AWTRIX NG display as an instant notification!
🛠️ Prerequisites
To use this, you need the following already set up:
A working Home Assistant installation.
An MQTT Broker (e.g., Mosquitto) installed in HA.
Your AWTRIX NG clock connected to your MQTT Broker.
A Telegram Bot Token (You can create one for free by messaging @BotFather on Telegram).
🚀 How to Install it (older HA version )
Step 1: Set up the Telegram Bot in Home Assistant If you haven't already, you need to enable Telegram polling in your Home Assistant configuration.yaml file. Add the following lines:
yaml
telegram_bot:
- platform: polling
api_key: "YOUR_TELEGRAM_BOT_TOKEN_FROM_BOTFATHER"
allowed_chat_ids:- 123456789 # Replace with your actual Telegram Chat ID!
(Restart Home Assistant after adding this).
Step 2: Customize the Automation Code Copy the YAML automation code provided in this thread. Before pasting it into Home Assistant, you need to change two things:
MQTT Prefix: Find and replace DEIN_PREFIX with your actual AWTRIX NG MQTT prefix (for example, awtrix_12345).
Sensors: Scroll down to the Status section in the code and replace sensor.DEINE_UHR_temperature (and the others) with the actual entity IDs of your clock in Home Assistant.
🚀 How to Install it ( Newer HA Version )
Step 1: Set up the Telegram Integration in Home Assistant In modern Home Assistant versions, Telegram is configured completely via the User Interface (no YAML needed):
Go to Settings -> Devices & Services.
Click Add Integration in the bottom right corner and search for Telegram.
Choose Polling as the setup method.
Enter your Bot Name, your Bot Token, and add your personal Chat ID to the "Allowed Chat IDs" list.
Step 2: Customize the Automation Code Copy the YAML automation code provided in this thread. Before pasting it into Home Assistant, you need to change two things:
MQTT Prefix: Find and replace DEIN_PREFIX with your actual AWTRIX NG MQTT prefix (for example, awtrix_12345).
Sensors: Scroll down to the Status section in the code and replace sensor.DEINE_UHR_temperature (and the others) with the actual entity IDs of your clock in Home Assistant.
Step 3: Import the Automation
In Home Assistant, go to Settings -> Automations & Scenes.
Click Create Automation -> Create new automation.
Click the three dots (⋮) in the top right corner and select Edit in YAML.
Delete the empty default code, paste your customized YAML code, and hit Save.
Step 4: Start Chatting! Open your bot in the Telegram app on your phone and type /start or simply say Hello. The bot will instantly reply with the interactive keyboard menu. Try pressing "Status" or typing a custom text message to see it appear on your clock!
Sign in to view and copy the code of this flow.
Discussion 0
Ask a question, suggest a change or share how you use it.
No comments yet. Start the conversation.
More flows for Home Assistant Blueprint or Smarthome
Something wrong with this flow? Report it.
Have an idea?
Sign in to ask questions and join the conversation.