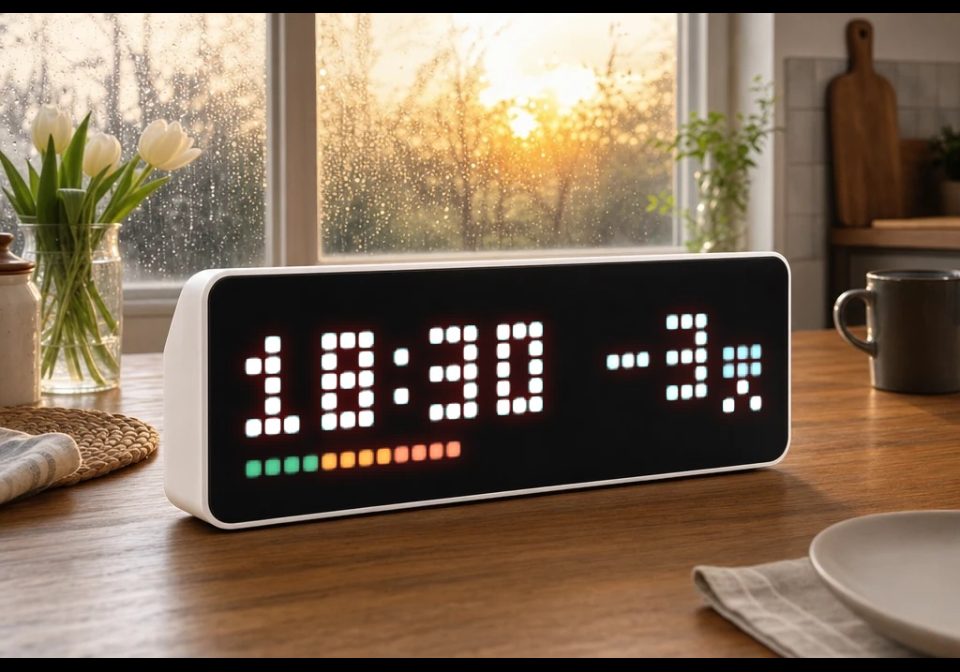
Clock with weather and electricity price bar
Time, outdoor temperature and a weather icon, with the current electricity price as a coloured bar along the bottom row
About this flow
| System | AWTRIX NG Scripts |
|---|---|
| AWTRIX version | AWTRIX NG |
| Topic | Smarthome |
| Built by | TSA3000 |
| File | BVxjfPPqTRpo.ax · 5.0 KB |
| Icons | — |
| Published | 12 Sep 2026 · updated 12 Sep 2026 |
| Downloads | 1 |
Is this your flow?
If you created this flow, open your saved edit link to add it to your account. You can then manage it whenever you sign in. Adding it to your account replaces the edit link.
Flow description
A clock app for AWTRIX NG written as a Berry script. The time comes from the clock's own NTP sync, so it keeps running if Home Assistant goes down. Outdoor temperature, weather and the electricity price arrive over MQTT.
Layout
- Time on the left
- Outdoor temperature, right aligned
- 3 pixel wide weather icon on the right edge
- Price bar on the bottom row
Price bar
One pixel for every started 25 öre/kWh, growing from the left.
- Pixels 1-4 green, up to 100 öre
- Pixels 5-8 orange, 100-200 öre
- Pixels 9-32 red, over 200 öre
0 öre or less still lights one green pixel. 800 öre or more fills the whole row.
Setup
- In the AWTRIX web UI go to Scripts, create a script called
ClockTempand paste the code. - Publish these MQTT topics with retain on:
awtrix/outdoor/temptemperature, e.g.15awtrix/outdoor/condHome Assistant weather state, e.g.partlycloudyawtrix/elprisprice in öre/kWh, e.g.35.82
- Topic names and the clock, temperature and bar colours can be changed in the script settings.
Home Assistant automations and a Node-RED flow for the MQTT feeds are in the repo: https://github.com/TSA3000/awtrix-ng-clock
No icons to install, the script draws everything itself.
At -10 degrees and colder the temperature touches the clock digits.
Tested on AWTRIX NG 1.1.0.
BVxjfPPqTRpo.ax
# @name    ClockTemp
# @desc    Left-aligned clock with outdoor temp, a 3px weather icon and an electricity price bar
# @config  temp_topic  text  "Temperature topic"  default="awtrix/outdoor/temp"
# @config  cond_topic  text  "Condition topic"    default="awtrix/outdoor/cond"
# @config  price_topic text  "Price topic (öre)"  default="awtrix/elpris"
# @config  time_col    color "Clock colour"       default=#FFFFFF
# @config  temp_col    color "Temp colour"        default=#C8C8C8
# @config  low_col     color "Price 0-100 colour"   default=#3B7A57
# @config  mid_col     color "Price 100-200 colour" default=#F77530
# @config  high_col    color "Price 200+ colour"    default=#FF6347

class ClockTemp
  var time_str, temp_str, icon_id, last_min, time_col, temp_col, codes
  var bar_g, bar_o, bar_r, low_col, mid_col, high_col

  def init()
    self.time_str = "--:--"
    self.temp_str = "--"
    self.icon_id  = 0
    self.last_min = -99
    self.time_col = store.get("time_col")
    self.temp_col = store.get("temp_col")
    self.bar_g = 0
    self.bar_o = 0
    self.bar_r = 0
    self.low_col  = store.get("low_col")
    self.mid_col  = store.get("mid_col")
    self.high_col = store.get("high_col")

    self.codes = {
      "sunny": 1, "clear-night": 2, "cloudy": 3, "partlycloudy": 4,
      "rainy": 5, "pouring": 6, "snowy": 7, "snowy-rainy": 8, "hail": 8,
      "fog": 9, "lightning": 10, "lightning-rainy": 10, "exceptional": 10,
      "windy": 11, "windy-variant": 11 }

    mqtt.subscribe(store.get("temp_topic"), def (t, p) self.on_temp(p) end)
    mqtt.subscribe(store.get("cond_topic"), def (t, p) self.on_cond(p) end)
    mqtt.subscribe(store.get("price_topic"), def (t, p) self.on_price(p) end)
  end

  def pad(n)
    if n < 10
      return "0" + str(n)
    end
    return str(n)
  end

  def on_temp(payload)
    if payload == nil || size(payload) == 0
      self.temp_str = "--"
      return
    end
    self.temp_str = payload
  end

  def on_cond(payload)
    if payload == nil
      self.icon_id = 0
      return
    end
    self.icon_id = self.codes.find(payload, 0)
  end

  # One pixel per started 25 öre on row 7: pixels 1-4 green (up to 100),
  # 5-8 orange (up to 200), the rest red. Zero or negative is one green pixel.
  def on_price(payload)
    var p = num(payload)
    if p == nil
      self.bar_g = 0
      self.bar_o = 0
      self.bar_r = 0
      return
    end
    var n = 1
    if p > 0
      n = int(p / 25)
      if n * 25 < p
        n += 1
      end
    end
    if n > 32
      n = 32
    end
    self.bar_g = n
    if self.bar_g > 4
      self.bar_g = 4
    end
    self.bar_o = n - 4
    if self.bar_o < 0
      self.bar_o = 0
    elif self.bar_o > 4
      self.bar_o = 4
    end
    self.bar_r = n - 8
    if self.bar_r < 0
      self.bar_r = 0
    end
  end

  def loop()
    var m = minute()
    if m != self.last_min
      self.last_min = m
      var h = hour()
      if h < 0
        self.time_str = "--:--"
      else
        self.time_str = self.pad(h) + ":" + self.pad(m)
      end
    end
  end

  def draw_icon()
    if self.icon_id == 1
      rect_fill(29, 3, 3, 3, 0xFFB000)
    elif self.icon_id == 2
      pixel(30, 2, 0x9FB8FF)  pixel(31, 3, 0x9FB8FF)
      pixel(31, 4, 0x9FB8FF)  pixel(30, 5, 0x9FB8FF)
    elif self.icon_id == 3
      pixel(30, 3, 0x8F9BA8)
      rect_fill(29, 4, 3, 2, 0x8F9BA8)
    elif self.icon_id == 4
      rect_fill(30, 2, 2, 2, 0xFFB000)
      rect_fill(29, 4, 3, 2, 0x8F9BA8)
    elif self.icon_id == 5
      rect_fill(29, 3, 3, 2, 0x8F9BA8)
      pixel(29, 6, 0x4FA8FF)  pixel(31, 6, 0x4FA8FF)
    elif self.icon_id == 6
      rect_fill(29, 2, 3, 2, 0x8F9BA8)
      pixel(29, 4, 0x4FA8FF)  pixel(31, 4, 0x4FA8FF)
      pixel(30, 5, 0x4FA8FF)
      pixel(29, 6, 0x4FA8FF)  pixel(31, 6, 0x4FA8FF)
    elif self.icon_id == 7
      rect_fill(29, 3, 3, 2, 0x8F9BA8)
      pixel(30, 5, 0xFFFFFF)
      pixel(29, 6, 0xFFFFFF)  pixel(31, 6, 0xFFFFFF)
    elif self.icon_id == 8
      rect_fill(29, 3, 3, 2, 0x8F9BA8)
      pixel(30, 5, 0x4FA8FF)
      pixel(29, 6, 0xFFFFFF)  pixel(31, 6, 0x4FA8FF)
    elif self.icon_id == 9
      line(29, 3, 31, 3, 0x8F9BA8)
      line(29, 5, 31, 5, 0x8F9BA8)
    elif self.icon_id == 10
      pixel(31, 2, 0xFFE300)  pixel(30, 3, 0xFFE300)
      pixel(31, 4, 0xFFE300)  pixel(30, 5, 0xFFE300)
      pixel(29, 6, 0xFFE300)
    elif self.icon_id == 11
      line(29, 3, 31, 3, 0x8F9BA8)
      line(30, 5, 31, 5, 0x8F9BA8)
    else
      pixel(30, 4, 0x8F9BA8)
    end
  end

  def draw_price()
    if self.bar_g > 0
      rect_fill(0, 7, self.bar_g, 1, self.low_col)
    end
    if self.bar_o > 0
      rect_fill(4, 7, self.bar_o, 1, self.mid_col)
    end
    if self.bar_r > 0
      rect_fill(8, 7, self.bar_r, 1, self.high_col)
    end
  end

  def draw()
    clear()
    text(0, 6, self.time_str, self.time_col)
    text(28 - text_ink_width(self.temp_str), 6, self.temp_str, self.temp_col)
    self.draw_icon()
    self.draw_price()
  end
end

return ClockTemp()
Install it on your AWTRIX NG
Add this flow to your AWTRIX NG. It will start appearing on your display after installation.
Unable to connect? Download the flow and add it in the Scripts section of your AWTRIX. Advanced users can also use this command:
Discussion 0
Ask a question, suggest a change or share how you use it.
No comments yet. Start the conversation.
More flows for AWTRIX NG Scripts or Smarthome
Something wrong with this flow? Report it.
Have an idea?
Sign in to ask questions and join the conversation.